Custom Chopper Build: 5 Powerful Steps for Easy Success 2025
The Ultimate Guide to Building Your Own Custom Chopper
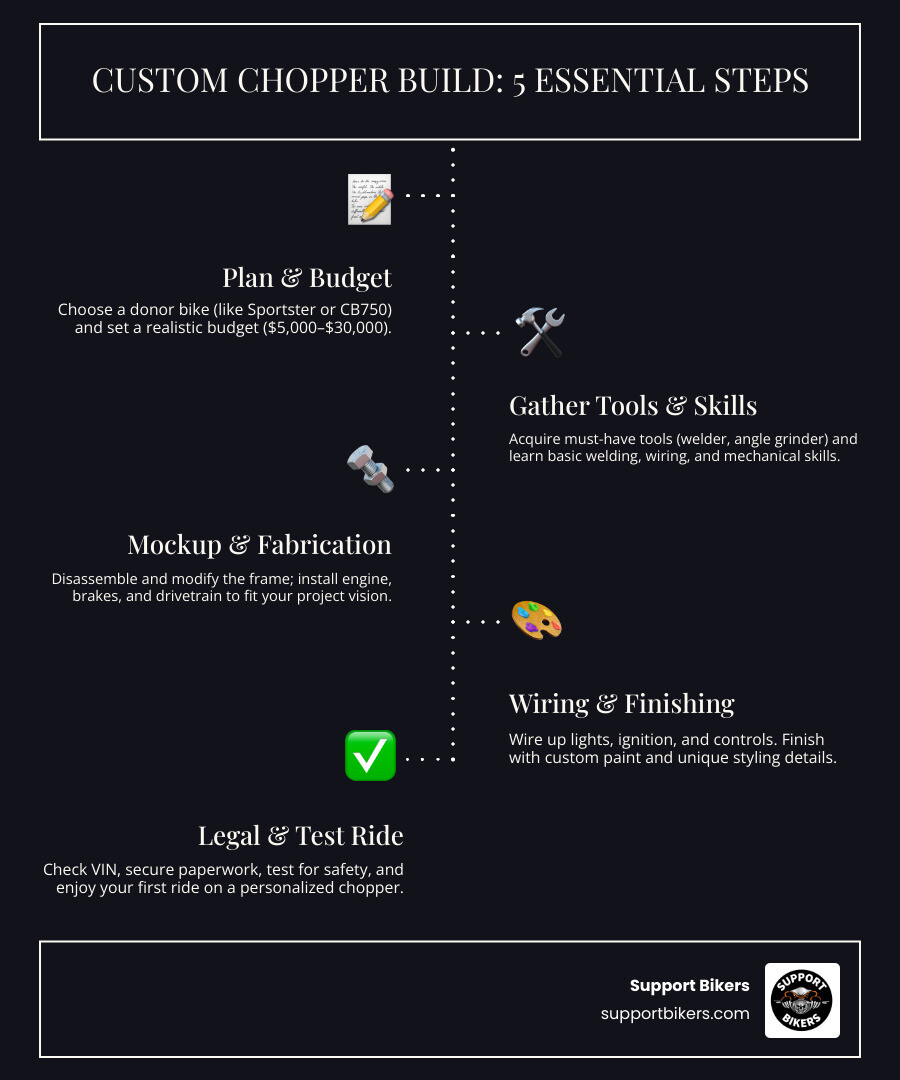
If you’re looking to build a custom chopper, here’s what you need to know:
- Budget: Expect to spend $5,000-$30,000 depending on parts and skill level
- Donor bike: Start with a complete running motorcycle (Sportster, CB750, or Shovelhead)
- Essential skills: Basic welding, wiring, and mechanical knowledge
- Timeline: Plan for 4x longer than your initial estimate
- Tools needed: Welder, angle grinder, socket sets, and a proper workspace
A custom chopper build represents the ultimate expression of motorcycle freedom and personal style. Unlike factory-built bikes, choppers embody their creator’s vision through extended forks, hardtail frames, and distinctive styling elements that turn heads wherever they roll.
Building your first chopper doesn’t require a professional shop or decades of experience. With patience, research, and the right donor bike, you can transform a standard motorcycle into a rolling work of art that reflects your unique vision. As forum experts consistently advise: “Always start with a complete running bike” to avoid the “expensive madness” of sourcing individual parts.
The journey begins with choosing the right platform. A running Evo Sportster can be found for approximately $3,000, making it an ideal starting point for first-timers. Other popular options include the Honda CB750 for budget builds or the authentic but more complex Shovelhead for those seeking classic American iron.
Why Build Your Own?
The question we hear most often is: “Why build when you can buy?” The answer lies in three key areas: passion, personalization, and budget control.
Building your own chopper creates a deep connection between rider and machine that can’t be replicated with a showroom purchase. Every weld, bolt, and design choice becomes a story you can tell.
Personalization is at the heart of the chopper culture. When you build your own, every aspect—from the frame geometry to the paint scheme—reflects your vision.
Finally, there’s the budget consideration. While a professionally built custom chopper can easily cost $30,000 or more, a home-built chopper using carefully sourced parts can be completed for as little as $5,000. The key is knowing where to invest and where to save.
Step 1 – Plan the Perfect Donor & Concept
The heartbeat of any successful custom chopper build begins with selecting the right donor motorcycle. This foundational decision shapes everything from your budget to the challenges you’ll face throughout your journey.
The most popular donor bikes each offer something unique:
The Honda CB750 makes an excellent starting point if you’re watching your wallet. These reliable Japanese classics have strong aftermarket support and respond well to customization.
A Harley Sportster strikes that sweet balance—plenty of available parts, manageable size for beginners, and that unmistakable V-twin rumble that turns heads. Many builders start here for good reason.
For purists, the Harley Shovelhead delivers authentic chopper heritage with an engine that looks like rolling sculpture. There’s something magical about that distinctive engine profile that screams “classic chopper.”
The Harley Evolution (Evo) offers improved reliability over older Harleys while maintaining that classic aesthetic. Think of it as the best of both worlds—traditional looks with fewer maintenance headaches.

Decide: Whole Bike vs Parts Pile
Starting with a complete, running motorcycle is almost always more economical and practical than piecing together a parts bike. A running donor provides the entire package—engine, transmission, wheels, brakes, and that intimidating wiring harness—all working together harmoniously. For around $3,000, you can find a solid Evo Sportster that runs like a top.
My advice? Purchase a complete bike that fires up and runs. Ride it stock for a few weeks to understand its personality and quirks. Then start your change with confidence, knowing exactly what you’re working with.
Style & Geometry Basics
Before you pick up that angle grinder, take time to understand the principles that make choppers handle the way they do.
Rake is the angle of your steering neck relative to vertical. When you see those stretched-out choppers with forks reaching toward the horizon, you’re looking at increased rake—typically between 30-40 degrees. It creates that unmistakable chopper profile but dramatically changes how the bike steers.
Trail might be less visible but it’s equally important—it’s the distance between where your front wheel touches the ground and where the steering axis would intersect the ground. Getting this measurement right ensures your bike remains stable rather than wobbling down the highway.
The hardtail versus softail decision impacts both aesthetics and your comfort. Traditional choppers feature hardtail frames with zero rear suspension, creating that clean, minimalist look. Softails cleverly hide shock absorbers to maintain the hardtail appearance while saving your spine.
Step 2 – Tools, Skills & Workspace Setup
Let’s get real about what you’ll need for your custom chopper build. You don’t need a fancy professional shop with gleaming tools, but you do need some essential equipment and a decent place to work.
Your basic tool arsenal should include a MIG welder (you can find decent entry-level models starting around $500), an angle grinder with both cutting and grinding discs, and complete socket and wrench sets. A motorcycle lift or sturdy workbench will save your back and make work infinitely easier. And please, don’t skimp on safety gear—a proper welding helmet, thick gloves, and eye protection aren’t optional extras.
Your workspace doesn’t need to be fancy, but good lighting is non-negotiable. You’ll want sufficient electrical outlets, proper ventilation (especially when you’re welding or painting), and secure storage for parts and tools.
For specialized jobs like machine work or powder coating, it’s worth building relationships with local motorcycle shops. The folks at Motorcycle Maintenance & Repair can help with the tasks beyond your capabilities or toolset.
Must-Learn Skills Before Cutting Metal
Welding is the foundation of any frame modification. Consider taking a basic welding course at your local community college, or at minimum, watch some detailed tutorials and practice on scrap metal.
Wiring might seem intimidating, but understanding basic circuits and proper connections will save you countless headaches. Nothing kills the joy of a finished build like electrical gremlins that leave you stranded.
While you don’t need to be a master mechanic, understanding engine fundamentals is crucial. Learn how to diagnose common issues and perform basic maintenance.
Fabrication skills start simple but develop with practice. Begin with straightforward projects to hone your metal-working abilities.
Budget & Parts Sourcing Hacks
Building your dream chopper doesn’t have to empty your bank account if you’re smart about it. Here’s how to stretch those dollars further.
First, be brutally honest with yourself about your budget. The old builder’s adage holds true: take your initial estimate and double it. While professional custom builds easily run $30,000+, a home-built chopper can come together for around $5,000 if you’re resourceful.
Salvage yards and swap meets are treasure troves for affordable parts. I’ve found pristine tanks, wheels, and even entire rear ends for fractions of retail prices.
Don’t overlook online marketplaces and forums. Fellow builders often sell off excess parts at reasonable prices.
Consider bartering your skills for parts or assistance. What skills do you have that might be valuable to other builders?
When it comes to spending, prioritize safety-critical components. Never cut corners on brakes, steering components, or suspension parts. Save money on cosmetic elements that can be upgraded later when your budget recovers.
Step 3 – Custom Chopper Build Walk-Through
Now we’re diving into the heart and soul of your custom chopper build—where dreams start taking physical form. This is where the rubber meets the road (or rather, where the metal meets the torch).
Your build journey will follow a natural progression that most builders find along the way. First comes the frame work—the skeleton that defines your chopper’s stance and attitude. Next, you’ll mount that rumbling heart (the engine) and its vital organs (transmission). Then comes the rolling gear, followed by the nervous system (wiring), and finally those personal touches that make it uniquely yours.

Frame & Suspension
The frame isn’t just metal tubes—it’s the backbone of your custom chopper build and determines your bike’s entire character. You’ve got two main paths forward:
You can modify your existing frame by carefully cutting and extending the neck and backbone. This approach gives you maximum creative freedom but demands serious welding chops and attention to geometry.
Alternatively, a weld-on hardtail kit offers a more approachable option, especially for first-timers. These kits replace your bike’s rear suspension with rigid tubes that create that classic chopper silhouette. For a Sportster or similar platform, these kits typically run $300-500 and come with clear instructions.
For the front end, those stretched forks are what give a chopper its distinctive profile. A 6-8 inch extension dramatically changes the bike’s look and handling.
Need quality frame components? Check out the Parts & Accessories Online Only section of our directory for trusted suppliers.
Powerplant, Transmission & Belt/Chain Drive
Many successful builders simply rebuild their donor bike’s engine, especially for a first project. A well-rebuilt stock motor delivers reliability without breaking the bank.
For those with deeper pockets, aftermarket engines from S&S or Ultima offer more power and that classic aesthetic appeal. An Ultima shovelhead-style motor runs about $4,000-$5,000 and delivers both visual impact and modern reliability.
When it comes to final drive, the belt versus chain debate continues in chopper circles. Belts offer a cleaner look and virtually maintenance-free operation, while chains provide that classic mechanical aesthetic.
For specialized engine work beyond your comfort zone, our directory includes professionals in Motorcycle Engine Tuning who can help dial in your powerplant for optimal performance.
Electrical & Lighting
Start by stripping your electrical system down to the essentials: charging system, ignition, lighting, and perhaps a few key accessories. Eliminating unused circuits from your donor bike creates a cleaner, more reliable system.
Digital control modules have revolutionized custom wiring. Products like the MotoGadget M-Unit let you create a clean, protected electrical system with minimal visible wiring.
Battery technology has advanced dramatically too. Lithium batteries offer compact size and light weight, allowing you to hide them almost anywhere—inside frame tubes, under the seat, or in custom-fabricated boxes.
For lighting, DOT-compliant LED options provide brightness, reliability, and minimal current draw. They’re available in styles from ultra-modern to vintage-inspired.
Finishing Touches & Style
This final phase transforms your mechanical project into a rolling work of art that expresses your personal vision. This is where your custom chopper build develops its unique character.
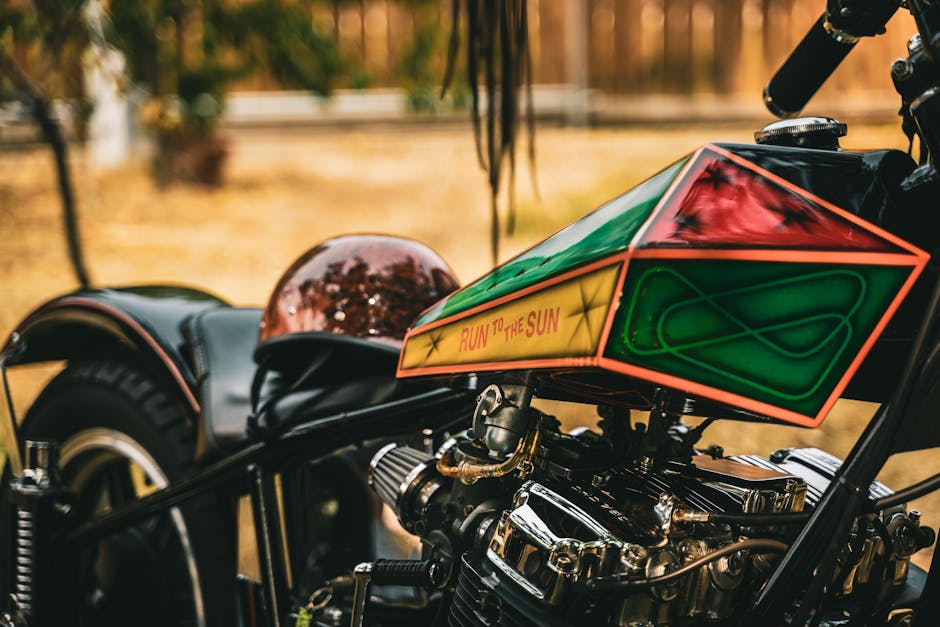
Paint makes or breaks a custom bike. While professional paint jobs can easily run $2,000-5,000, many builders achieve impressive results with careful DIY work. The key is preparation—90% of a great paint job happens before the color ever goes on.
Your seat choice impacts both comfort and style. Custom seats can be fabricated using a wooden or fiberglass base, foam, and upholstery.
Handlebars dramatically affect both the look and feel of your chopper. Options range from moderate pullbacks to sky-high ape hangers. What looks cool in a parking lot might feel miserable after an hour on the highway.
The exhaust system adds both visual impact and auditory character. From simple straight pipes to complex hand-fabricated systems, your exhaust choice can be a signature element.
Step 4 – Legal, Safety & Roadworthiness
The thrill of completing your custom chopper build is incomparable, but turning that mechanical artwork into a street-legal machine deserves equal attention. After all, what good is a stunning chopper if you can’t legally cruise down the highway?
Safety isn’t just about passing inspections—it’s about protecting yourself and enjoying your creation for years to come. Every custom build should include proper functioning brakes (ideally both front and rear, despite some builders skipping the front brake for aesthetic reasons).
Make sure your steering has appropriate stops to prevent over-rotation, and verify that all controls are comfortably within reach when seated. Wheel alignment might seem obvious, but even slight misalignments can cause dangerous handling issues at highway speeds.
Legal requirements vary significantly between states and countries, but most jurisdictions require:
- DOT-approved lighting (headlight, taillight, and turn signals)
- Properly positioned reflectors
- A functioning horn
- At least one mirror (though requirements vary)
- A correctly mounted license plate with illumination
Before your maiden voyage, perform a comprehensive pre-ride inspection. Tighten all fasteners to their proper torque specifications—a loose primary bolt can quickly ruin your day.
For valuable guidance on mastering the unique handling characteristics of your new creation, check out our guide on How to Ride a Chopper.
Registration Paperwork Tips
Keep every receipt for major components, especially the frame and engine. These establish your bike’s history and prove you didn’t “acquire” parts through questionable means.
In most cases, you’ll use the VIN from your donor bike’s frame. If you’re building from scratch with an aftermarket frame, requirements for obtaining a new VIN vary dramatically by state.
When purchasing your donor bike, insist on receiving a clean, properly signed title. Addressing title issues before you start cutting and welding saves enormous headaches down the road.
Many states require a builder’s statement or affidavit certifying the bike’s construction and component sources. Research your state’s specific requirements early in your build process.
First Shakedown Ride
After months of work, the moment of truth arrives—your first ride on your custom chopper build. This is both exciting and nerve-wracking, but a methodical approach helps ensure success.
Begin with short rides around your neighborhood or quiet back roads. This controlled environment lets you identify any issues before you’re miles from home.
Be prepared for an adjustment period. Choppers handle fundamentally differently than stock motorcycles. The extended front end, altered geometry, and different seating position require adaptation.
Pay close attention to sounds, vibrations, and handling characteristics. That slight wobble at 45 mph might be harmless—or it might indicate a serious alignment issue.
If you’ve rebuilt the engine, proper break-in is essential. Follow a gentle heat cycling process with varying RPMs rather than constant speeds. This helps rings seat properly and ensures long engine life.
After returning from your first ride, perform another thorough inspection. Check for loose fasteners, fluid leaks, or alignment issues that might have developed.
Help support fellow riders who’ve experienced accidents or injuries by contributing to our Wrecked Rider Fund.
Step 5 – Maintenance, Upgrades & Troubleshooting
Completing your custom chopper build is just the beginning of your journey. Proper maintenance ensures your creation remains reliable for years to come.
Regular Maintenance Tasks:
– Change oil more frequently than factory recommendations (every 1,500-2,000 miles)
– Check and adjust chain tension or belt alignment
– Verify spoke tension on spoked wheels
– Inspect all fasteners for proper torque
– Clean and protect exposed metal surfaces
Common Issues and Solutions:
– Electrical Gremlins: Often traced to poor grounds or loose connections
– Fuel Delivery Problems: Usually related to carburetor adjustment or fuel line routing
– Vibration-Related Failures: Address by adding locking compounds to fasteners and regular inspections
– Alignment Issues: Can cause unusual tire wear or handling problems
Keep a dedicated tool roll with sizes specific to your chopper. Include basic roadside repair items like zip ties, electrical tape, and a multi-tool.
Common Rookie Mistakes & Fixes
Through our years of experience and community connections, we’ve identified these common first-build errors:
Over-Tightening Fasteners: Always use a torque wrench on critical components. Stripped threads and broken bolts are common rookie mistakes.
Inadequate Wiring: Undersized wires, poor connections, and improper fusing lead to electrical failures. Use the correct gauge wire and proper connectors.
Ignoring Ergonomics: Building a bike that looks amazing but is uncomfortable to ride defeats the purpose. Consider riding position during design.
Rushing the Finish: After months of work, many builders rush the final assembly. Take your time with final adjustments and detailing.
Neglecting Safety Items: Never compromise on brakes, steering components, or other safety-critical systems to save money or time.
Future Customization Ideas
Once you’ve completed your first custom chopper build and enjoyed riding it, you’ll inevitably start thinking about upgrades or your next project. Consider these improvements:
Performance Upgrades:
– Improved braking systems (perhaps dual-disc front setups)
– Cartridge fork internals for better handling
– High-flow air cleaners and rejetting for more power
– Electronic ignition conversion for older engines
Style Improvements:
– Custom paint with more complex designs
– One-off machined parts and brackets
– Upgraded lighting systems
Comfort Improvements:
– Revised ergonomics based on riding experience
– Upgraded seat with better support
– Vibration isolation for handlebars and footpegs
Frequently Asked Questions about a Custom Chopper Build
How much does it cost to build a chopper from scratch?
The reality of a custom chopper build is that your wallet will feel it—but how deeply depends entirely on your approach. Building at home with a donor bike and some savvy parts hunting can keep costs around $5,000, while professional builds start dancing around $15,000 and can waltz well past $30,000 for showcase-quality machines.
Your budget will be shaped by several key factors. The donor bike itself typically runs between $1,000 for a project case to $5,000 for something clean and running. Engine decisions make a massive difference—rebuilding what you have might cost $500 in parts, while that gorgeous S&S crate engine commands $5,000.
I’ve yet to meet a builder whose project didn’t exceed their initial budget by at least 50%—it’s practically a law of custom motorcycle physics.
What’s the easiest first-time donor platform?
For your first build, choosing the right donor makes all the difference between completion and frustration. The Harley-Davidson Sportster (particularly 1986-2003 Evo models) offers an ideal starting point—these bikes combine excellent parts availability with manageable size and that authentic V-twin rumble. You can typically find a running Evo Sportster for around $3,000, making it financially accessible too.
The Honda CB750 (especially 1969-1978 models) presents another excellent option. These Japanese workhorses deliver legendary reliability with good aftermarket support and often come with friendlier price tags than their American counterparts.
For those drawn to authentic chopper heritage, the Harley-Davidson Shovelhead delivers undeniable style and character. Just be aware that these classics typically demand more maintenance knowledge and specialized skills.
Whatever platform speaks to you, remember the golden rule: start with a complete, running motorcycle.
Do I need a welding certification?
No formal certification is required to build a motorcycle for personal use, but proper welding skills are absolutely essential for safety. Your welds will literally hold your life above the pavement at highway speeds.
I strongly recommend taking a basic welding course at your local community college or technical school. These typically run 6-8 weeks and provide supervised practice with proper equipment. Before touching your precious motorcycle frame, practice extensively on scrap metal—make dozens of test welds and destructively test them to see how they hold up.

Conclusion
Building your own custom chopper isn’t just about creating a motorcycle—it’s a transformative journey that challenges your mechanical abilities, tests your patience, and releases your creativity. There’s something deeply satisfying about cruising down an open highway astride a machine born from your own vision and crafted by your own hands.
One of the most beautiful aspects of chopper culture is its community. Bikers are extraordinarily generous with their knowledge and support. When you hit a roadblock (figuratively, we hope), don’t hesitate to reach out. The Support Bikers directory connects enthusiasts with resources, businesses, and fellow builders who understand your passion and can help bring your vision to life. Our network includes experienced custom motorcycle builders across the country who can offer guidance or handle specialized aspects of your project when needed.
Your first custom chopper build likely won’t be perfect—and that’s completely okay. Each challenge you overcome teaches valuable lessons that will improve your skills for future projects.
The road ahead is filled with challenges and rewards in equal measure. Take your time, build it right, and when your creation finally roars to life, you’ll understand why builders become addicted to that feeling of accomplishment that simply can’t be bought off a showroom floor.
Keep the rubber side down, the shiny side up, and enjoy every moment of creating your rolling work of art.
Support fellow riders who’ve faced misfortune on the road through our Wrecked Rider Fund. Your contribution helps bikers when they need it most—because we all know the brotherhood of motorcycling is about having each other’s backs.
0 Comments